Tips and Tricks
Design your CEWE PHOTOBOOK cover with creativity and love.
23rd November 2020
They say don’t judge a book by its cover, but we believe the cover is one of the most important elements to creating your CEWE PHOTOBOOK. At first glance, the cover gives you or your loved ones a sneak preview of what's inside: unforgettable memories and happy moments preserved in pictures that you can relive again and again. That’s why we feel it is worthwhile putting that extra time, thought and effort into designing the cover of your CEWE PHOTOBOOK. Promise pure emotions at first glance, even from the bookshelf. After all, it will be protecting your most treasured moments and experiences inside for years to come.
Our free downloadable Creator Software offers you numerous design and template options to transform your title, spine, front and back into the cover of your dreams. Alternatively, you can get creative and create your own unique photo book cover design. We’ve put together some useful hints and tips to creating easy, yet stylish, covers for your photo books.

Make your title big!
Big letters are a great way to prominently feature a title on your CEWE PHOTOBOOK. For example, in this modern design below, the word LOVE is the main focal point using large lettering. It cleverly blends in with the white background and placing of your photos. This photo book cover design is really easy to replicate with any font in our Creator Software and is a great way to show a variety of snapshots into what is inside your stunning CEWE PHOTOBOOK.
How To:
- Open the Creator Software and select your Large CEWE PHOTOBOOK in your desired paper quality, with a hardcover. You’ll be prompted to create your photo book with either the help from the in-built assistant, or you can design from scratch. Select the design option to start with blank pages and have creative freedom with your photo book.
- Choose a font for your cover design that consists of letters that are the same width. For our example we have used “Mono 45” with a size of 240pt. In addition to the pre-installed fonts, the Creator Software also shows all the fonts that you have downloaded and installed on your PC or Mac.
- Insert text boxes of the same size for each letter and add your text, with one letter in each text box. Use the arrange tool to help you with alignment so that the letters are perfectly centred and spaced from top to bottom.
- Use the same colour for your font as the background so that it will blend in when you add the photos. We chose to use white in this example.
- Each letter will be framed by two photos. Insert your chosen images to the left and right of the letters, ensuring that you leave a gap around the outer edges of the cover to produce a border effect. Your images may overlap your text – simply right click on the image and select ‘Send back’.

Get creative with shapes
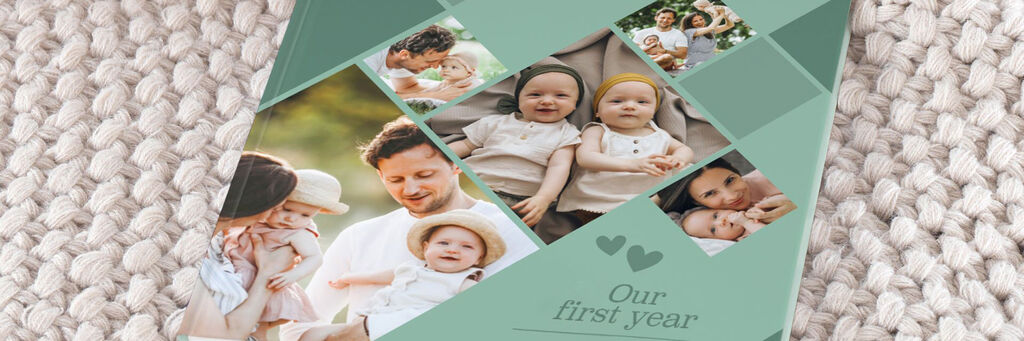
Display a selection of your top favourite photos in small squares to get a special sneak preview into what is inside your CEWE PHOTOBOOK. Lay the squares out like tiles or experiment with other shapes, such as circles or diamonds, for a truly unique cover. You can leave a few of the tiles as coloured blocks to feature text elements, like titles and dates, or add themed clipart to complete the look. Here’s how to replicate a modern diamond design for your photo book.
How To:
- Tiled designs work best with our Square CEWE PHOTOBOOK. In the Creator Software, choose between our standard Square size and our XL Square for the bigger projects like this one. Pick your desired paper type and hardcover before selecting to design without the Assistant so you can start your photo book with fresh blank pages.
- Choose a plain colour of your choice from the ‘Background’ selection area to the left of the Creator Software. We recommend picking a similar colour to the tones and shades you have in your chosen photos, or choose a contrasting background colour to make your photo book stand out.
- If you haven’t done so already, upload five of your favourite photos that you wish to feature on your cover. If you need to resize your images into a square, double-click on the photo within the Creator Software to conveniently edit and crop directly.
- Once your images are uploaded onto your cover, use the Masks & Frames option to find a diamond shape. Simply drag and drop the Mask onto your photos to automatically shape them. Vary the sizes of your diamonds and photos, spacing them out equally.
- Add further dimension to your cover with coloured blocks. This can be easily done by adding square shaped clipart and rotating it until it matches the angles of your diamonds. Colour the clipart in a slightly lighter or darker tone of your background to keep consistency with your colour scheme.
- Remember to keep some space free to add a title to your photo book cover. Use the text tool and select a font that suits your style. You can also add themed clipart to bring more personality to your cover, such as hearts or a small aeroplane for a travel photo book cover.

Let your photo do the talking
This one is for the minimalists amongst us! (Or those that simply want to showcase their favourite photo.) Whether you’re an amateur photographer or are particularly proud of a photo you’ve captured, feature that special snap across the entire front cover page for a simple, yet premium, photo book cover.
How To:
- Simply choose any CEWE PHOTOBOOK size, paper type and cover option you wish in the Creator Software. Select ‘Start designing’ to create your cover on a blank page.
- Right click that special image you wish to feature and select “Image as background on current right page.” If your shot is an impressive panoramic photo, you can choose to spread your image over the front and back cover by right clicking and selecting “Image as background on both pages.”
- Add a title to your cover. We recommend finding a spot in your image that has an empty space or a block of colour so your text can stand out.

Make it Shine!
Make your CEWE PHOTOBOOK cover stand out with an added touch of luxury. Transform your titles and clipart into metallic or gloss Highlights for a premium embossed finish. Available in gold, rose gold, silver or gloss, you’ll want to keep your photo book on display for all to see!
How To:
- In this 2020 yearbook example, we’ve added individual numbers to a square text box using Courier PS font in size 172pt. The larger the font, the more impressive the Highlights will look!
- Select each text box in turn and add Highlights from the top toolbar in the Creator Software. To help you identify it, the icon looks like a diamond and can be found in the centre of your screen.
- Don’t just stick to text! You can add Highlights to certain clipart icons to add more dimension and finish your book with a luxurious embossed finish.

Create Your Own CEWE PHOTOBOOK Cover Design
Our Creator Software makes it easy for you to get creative with your own photo book cover ideas. Create your own masterpiece from scratch - we hope our tips and tricks have inspired you! Alternatively, you can choose from our wide range of modern design templates ready and waiting for you to add your own cherished memories and make it your own. Happy designing!
Never miss an offer again with the Boots Photo Newsletter
- Latest news and product launches
- Offers
- Competitions
- Inspiration and ideas
Registration Successful
For data protection reasons, you will receive a confirmation e-mail shortly.
Please click the confirmation link in the e-mail to activate your free subscription to our newsletter.
You can, of course, cancel your subscription at any time.
Sorry!
Unfortunately, we were not able to sign you up for our newsletter. Please try again later.


